Amazonで、「商品名:Raspberry Pi ラズベリーパイ用の USB-TTLシリアルコンソールのUSB変換COMケーブルモジュールのケーブル」を購入した。

Amazonプライムの表示あるところから、2個購入。ひとつ385円。だったが、価格が低い商品が出品されています。新品の出品:¥181より、とさらに安いものもあった。
お届けが翌日になってて、そんなに早くこないよねと思いきや、ゆうパケットの翌日ワイドで翌日ちゃんと届いた。

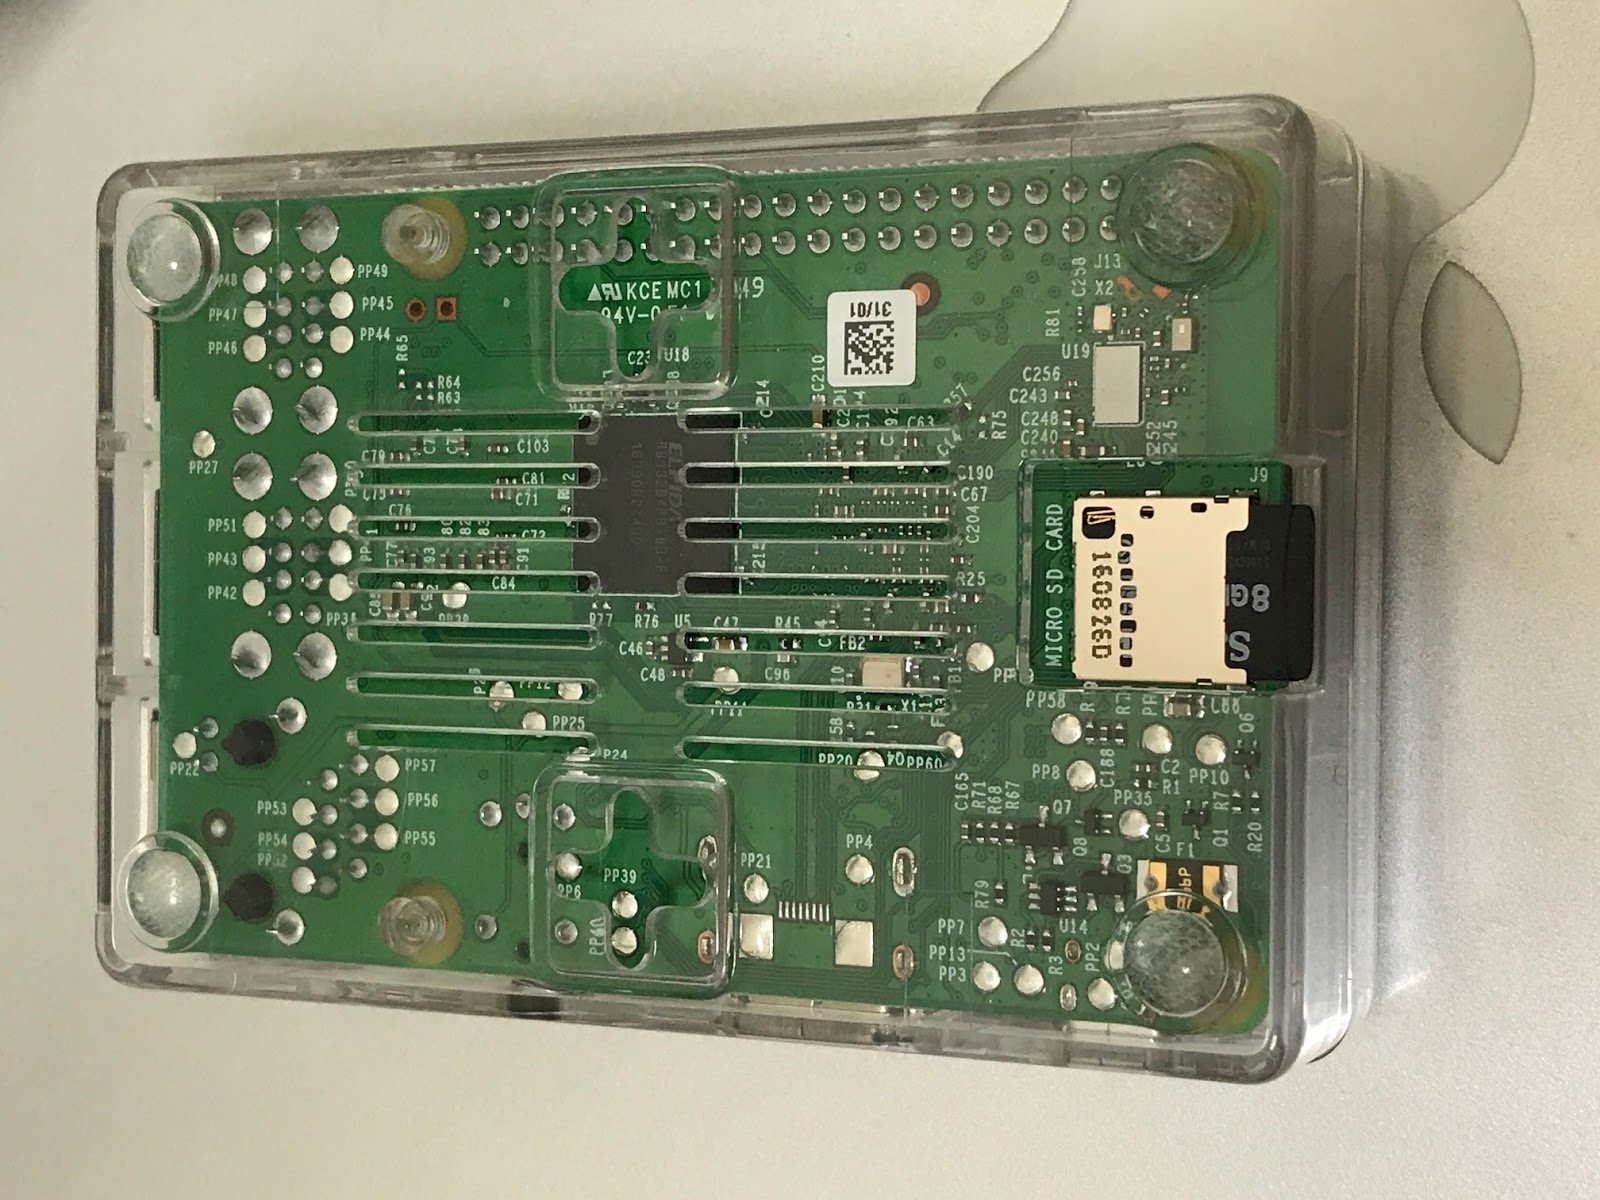
Raspberry Pi3の差し込んだピン位置。外側13ピンラインの右から、2つ空けて、黒白緑の順にピンを挿した。(黒6pin:GND, 白8pin:TX, 緑10pin:RX)赤VCC[5V]は使わない。
(1)Raspberry Pi3の設定変更内容
root@rapi3:/boot# diff cmdline.txt.org cmdline.txt
1c1
< dwc_otg.lpm_enable=0 console=serial0,115200 console=tty1 root=PARTUUID=cedef3be-02 rootfstype=ext4 elevator=deadline fsck.repair=yes rootwait quiet splash plymouth.ignore-serial-consoles
---
> dwc_otg.lpm_enable=0 console=serial0,115200 console=tty1 root=PARTUUID=cedef3be-02 rootfstype=ext4 elevator=deadline fsck.repair=yes rootwait
# cmdline.txt 1行目rootwaitの後ろを削除

root@rapi3:/boot# diff config.txt.org config.txt
56a57,60
>
> ## http://akkagi.info/20161004_web/ (参照Webページ)
> dtoverlay=pi3-miniuart-bt
>
# config.txt 最後の行にpi3-miniuart-btを追加
(2)現時点のrebootコンソールメッセージ例
# メッセージ全文は Rapi3_reboot_Message.txt を参照のこと。
# 2017-04-10-raspbian-jessie.zip版
root@rapi3:/boot# reboot
[  OK  ] Started Show Plymouth Reboot Screen.
[  OK  ] Removed slice user-1000.slice.
         Stopping Permit User Sessions...
         Stopping Login Service...
[  OK  ] Stopped Login Service.
[  OK  ] Stopped Permit User Sessions.
[  OK  ] Stopped target Network.
         Stopping dhcpcd on all interfaces...

#(たち下げ 省略)

[  OK  ] Stopped Create Static Device Nodes in /dev.
         Stopping Remount Root and Kernel File Systems...
[  OK  ] Stopped Remount Root and Kernel File Systems.
[  OK  ] Reached target Shutdown.
[  146.546572] watchdog watchdog0: watchdog did not stop!
[  146.842584] reboot: Restarting system

#(ここで再起動)

[    0.000000] Booting Linux on physical CPU 0x0
[    0.000000] Initializing cgroup subsys cpuset
[    0.000000] Initializing cgroup subsys cpu
[    0.000000] Initializing cgroup subsys cpuacct
[    0.000000] Linux version 4.4.50-v7+ (dc4@dc4-XPS13-9333) (gcc version 4.9.3 (crosstool-NG crosstool-ng-1.22.0-88-g8460611) ) #970 SMP Mon Feb 20 19:18:29 GMT 2017
[    0.000000] CPU: ARMv7 Processor [410fd034] revision 4 (ARMv7), cr=10c5383d
[    0.000000] CPU: PIPT / VIPT nonaliasing data cache, VIPT aliasing instruction cache
[    0.000000] Machine model: Raspberry Pi 3 Model B Rev 1.2
[    0.000000] cma: Reserved 8 MiB at 0x3a800000
[    0.000000] Memory policy: Data cache writealloc
[    0.000000] [bcm2709_smp_init_cpus] enter (9520->f3003010)
[    0.000000] [bcm2709_smp_init_cpus] ncores=4
[    0.000000] PERCPU: Embedded 13 pages/cpu @b9f62000 s22592 r8192 d22464 u53248
[    0.000000] Built 1 zonelists in Zone order, mobility grouping on.  Total pages: 239540
[    0.000000] Kernel command line: 8250.nr_uarts=1 bcm2708_fb.fbwidth=656 bcm2708_fb.fbheight=416 bcm2708_fb.fbswap=1 dma.dmachans=0x7f35 bcm2709.boardrev=0xa32082 bcm2709.serial=0xecc73d96 bcm2709.uart_clock=48000000 smsc95xx.macaddr=B8:27:EB:C7:3D:96 vc_mem.mem_base=0x3dc00000 vc_mem.mem_size=0x3f000000  dwc_otg.lpm_enable=0 console=ttyAMA0,115200 console=tty1 root=PARTUUID=cedef3be-02 rootfstype=ext4 elevator=deadline fsck.repair=yes rootwait
[    0.000000] PID hash table entries: 4096 (order: 2, 16384 bytes)
[    0.000000] Dentry cache hash table entries: 131072 (order: 7, 524288 bytes)
[    0.000000] Inode-cache hash table entries: 65536 (order: 6, 262144 bytes)
[    0.000000] Memory: 939064K/966656K available (6357K kernel code, 432K rwdata, 1716K rodata, 476K init, 764K bss, 19400K reserved, 8192K cma-reserved)
[    0.000000] Virtual kernel memory layout:
[    0.000000]     vector  : 0xffff0000 - 0xffff1000   (   4 kB)
[    0.000000]     fixmap  : 0xffc00000 - 0xfff00000   (3072 kB)
[    0.000000]     vmalloc : 0xbb800000 - 0xff800000   (1088 MB)
[    0.000000]     lowmem  : 0x80000000 - 0xbb000000   ( 944 MB)
[    0.000000]     modules : 0x7f000000 - 0x80000000   (  16 MB)
[    0.000000]       .text : 0x80008000 - 0x807ea73c   (8074 kB)
[    0.000000]       .init : 0x807eb000 - 0x80862000   ( 476 kB)
[    0.000000]       .data : 0x80862000 - 0x808ce350   ( 433 kB)
[    0.000000]        .bss : 0x808d1000 - 0x809901ec   ( 765 kB)
[    0.000000] SLUB: HWalign=64, Order=0-3, MinObjects=0, CPUs=4, Nodes=1
[    0.000000] Hierarchical RCU implementation.
[    0.000000]  Build-time adjustment of leaf fanout to 32.
[    0.000000] NR_IRQS:16 nr_irqs:16 16
[    0.000000] Architected cp15 timer(s) running at 19.20MHz (phys).
[    0.000000] clocksource: arch_sys_counter: mask: 0xffffffffffffff max_cycles: 0x46d987e47, max_idle_ns: 440795202767 ns
[    0.000009] sched_clock: 56 bits at 19MHz, resolution 52ns, wraps every 4398046511078ns
[    0.000026] Switching to timer-based delay loop, resolution 52ns
[    0.000289] Console: colour dummy device 80x30
[    0.001351] console [tty1] enabled
[    0.001402] Calibrating delay loop (skipped), value calculated using timer frequency.. 38.40 BogoMIPS (lpj=192000)
[    0.001471] pid_max: default: 32768 minimum: 301
[    0.001804] Mount-cache hash table entries: 2048 (order: 1, 8192 bytes)
[    0.001847] Mountpoint-cache hash table entries: 2048 (order: 1, 8192 bytes)
[    0.002805] Disabling cpuset control group subsystem
[    0.002865] Initializing cgroup subsys io
[    0.002917] Initializing cgroup subsys memory
[    0.002983] Initializing cgroup subsys devices
[    0.003026] Initializing cgroup subsys freezer
[    0.003070] Initializing cgroup subsys net_cls
[    0.003141] CPU: Testing write buffer coherency: ok
[    0.003227] ftrace: allocating 21246 entries in 63 pages
[    0.051843] CPU0: update cpu_capacity 1024
[    0.051910] CPU0: thread -1, cpu 0, socket 0, mpidr 80000000
[    0.051943] [bcm2709_smp_prepare_cpus] enter

#(たち上げ 省略その1)

[    2.154465] console [ttyAMA0] enabled
[    2.160720] of_cfs_init
[    2.165326] of_cfs_init: OK
[    2.182922] EXT4-fs (mmcblk0p2): mounted filesystem with ordered data mode. Opts: (null)
[    2.195358] VFS: Mounted root (ext4 filesystem) readonly on device 179:2.
[    2.212661] devtmpfs: mounted
[    2.218599] Freeing unused kernel memory: 476K (807eb000 - 80862000)
[    2.501294] random: systemd: uninitialized urandom read (16 bytes read, 71 bits of entropy available)
[    2.519201] systemd[1]: systemd 215 running in system mode. (+PAM +AUDIT +SELINUX +IMA +SYSVINIT +LIBCRYPTSETUP +GCRYPT +ACL +XZ -SECCOMP -APPARMOR)
[    2.538021] systemd[1]: Detected architecture 'arm'.
[    2.664486] NET: Registered protocol family 10
[    2.673050] systemd[1]: Inserted module 'ipv6'
[    2.681886] systemd[1]: Set hostname to .
[    2.689294] random: systemd: uninitialized urandom read (16 bytes read, 71 bits of entropy available)
[    2.703853] systemd[1]: Initializing machine ID from random generator.
[    2.713430] systemd[1]: Installed transient /etc/machine-id file.
[    2.794797] uart-pl011 3f201000.uart: no DMA platform data

#(たち上げ 省略その2)

[    4.288162] systemd[1]: Starting Create Static Device Nodes in /dev...
[  OK  ] Started Load/Save Random Seed.
[  OK  ] Started Show Plymouth Boot Screen.
[  OK  ] Reached target Paths.
[  OK  ] Created slice system-systemd\x2drfkill.slice.
         Starting Load/Save RF Kill Switch Status of rfkill0...
[  OK  ] Started Load/Save RF Kill Switch Status of rfkill0.
[  OK  ] Created slice system-ifup.slice.
[    5.542455] systemd-fsck[210]: fsck.fat 3.0.27 (2014-11-12)
[    5.544082] systemd-fsck[210]: /dev/mmcblk0p1: 132 files, 41536/82644 clusters
[  OK  ] Started File System Check on /dev/disk/by-partuuid/cedef3be-01.
         Mounting /boot...
[  OK  ] Mounted /boot.
[  OK  ] Reached target Local File Systems.

#(たち上げ 省略その3)

[  OK  ] Started D-Bus System Message Bus.
[  OK  ] Started Avahi mDNS/DNS-SD Stack.
         Starting System Logging Service...
[  OK  ] Started Restore Sound Card State.
[  OK  ] Started dhcpcd on all interfaces.
[  OK  ] Started LSB: triggerhappy hotkey daemon.
[  OK  ] Started LSB: Autogenerate and use a swap file.
[FAILED] Failed to start LSB: Start VNC Server at boot time.
See 'systemctl status vncboot.service' for details.
[  OK  ] Reached target Network.
         Starting OpenBSD Secure Shell server...
[  OK  ] Started OpenBSD Secure Shell server.
         Starting /etc/rc.local Compatibility...
[  OK  ] Reached target Network is Online.
         Starting LSB: Start NTP daemon...
         Starting Permit User Sessions...
[  OK  ] Started Login Service.
[  OK  ] Started Permit User Sessions.
         Starting Light Display Manager...
[  OK  ] Started System Logging Service.
[  OK  ] Started /etc/rc.local Compatibility.
[  OK  ] Started LSB: Start NTP daemon.
         Starting Terminate Plymouth Boot Screen...
         Starting Hold until boot process finishes up...

Raspbian GNU/Linux 8 rapi3 ttyAMA0

rapi3 login: root
Password:
Last login: Wed May 31 09:17:47 JST 2017 on ttyAMA0
Linux rapi3 4.4.50-v7+ #970 SMP Mon Feb 20 19:18:29 GMT 2017 armv7l

The programs included with the Debian GNU/Linux system are free software;
the exact distribution terms for each program are described in the
individual files in /usr/share/doc/*/copyright.

Debian GNU/Linux comes with ABSOLUTELY NO WARRANTY, to the extent
permitted by applicable law.
root@rapi3:~# date
Wed 31 May 09:19:30 JST 2017
root@rapi3:~#

(3)起動に問題があるときは、[FAILED]が赤文字で出て分かりやすい。
% ls -l /dev/tty.usbserial
crw-rw-rw-  1 root  wheel   37,  22  5 31 14:55 /dev/tty.usbserial

% system_profiler SPUSBDataType \
    | awk '
      /Product ID:/{p=$3}
      /Vendor ID:/{v=$3}
      /Manufacturer:/{sub(/.*: /,""); m=$0}
      /Location ID:/{sub(/.*: /,""); printf("%s:%s %s (%s)\n", v, p, $0, m);}
    ' | grep 2303
0x067b:0x2303 0x14100000 / 30 (Prolific Technology Inc.)
%

このMacについて>システムレポート
▼ USB 3.0バス
  USB-Serial Controller
USB-Serial Controller:
  製品ID:  0x2303
  製造元ID:  0x067b  (Prolific Technology, Inc.)
  バージョン:  3.00
  速度:  最高12 Mb/秒
  製造元:  Prolific Technology Inc.
  場所ID:  0x14100000 / 30
  利用可能な電流(mA):  500
  必要な電流(mA):  100
  高負荷時消費電流(mA):  0
(4)macOS Sierra でこのシリアルUSBケーブルが認識されると、macOSでは上記ように見える。
チップメーカURL
http://prolificusa.com/portfolio/pl2303hx-rev-d-usb-to-serial-bridge-controller/
(5)シリアルポートからのメッセージは以下のスクリプト usb_kermit_raspi.sh で自動で記録されるようにしている。ツールは伝統的な kermit を Homebrew からインストールして使っている。
% cat /usr/local/bin/usb_kermit_raspi.sh
#!/bin/sh
set -x
YMDHM=`date '+%Y%m%d_%H%M'`
cat /Users/myname/.kermrc_raspi |\
  sed -e s/append_raspi/append_raspi_${YMDHM}/ > \
  /Users/myname/.kermrc_raspi_YMD
kermit -y /Users/myname/.kermrc_raspi_YMD

% cat /Users/myname/.kermrc_raspi
set line /dev/tty.usbserial
set speed 115200
SET CARRIER-WATCH OFF
log session /Users/myname/Usr/RaspberryPi/ConsLog/append_raspi
connect

% ls -l /usr/local/bin/kermit
... Feb  3  2015 /usr/local/bin/kermit -> ../Cellar/c-kermit/9.0.302/bin/kermit

% head -7 /Users/myname/Usr/RaspberryPi/ConsLog/append_raspi_20170531_0917

Raspbian GNU/Linux 8 rapi3 ttyAMA0

rapi3 login: root
Password:
Last login: Wed May 31 09:16:10 JST 2017 on ttyAMA0
Linux rapi3 4.4.50-v7+ #970 SMP Mon Feb 20 19:18:29 GMT 2017 armv7l
シェルスクリプトの usb_kermit_raspi.sh は、ワークファイルが2つあって不細工である。ヒアドキュメント(heredoc)でスクリプト一つで書きたかったが、動いていれば、まあいいかと、なかなか書き直せない。
(6)シリアルポート接続(windows編)
別記事 RPi_0023 win10_PL2303_teraterm
(7)PL2303 Mac OS X Driver Download
このWebページ、
http://www.prolific.com.tw/US/ShowProduct.aspx?p_id=229&pcid=41
を開いて、
PL2303 Mac OS X Driver Download

Download File: PL2303_MacOSX_1.6.1_20160309.zip
 Mac OS X Universal Binary Driver v1.6.0 (PKG file format)
  For Mac OS Sierra (version 10.12)
  For Mac OS X El Capitan (version 10.11)
  For Mac OS X Yosemite (version 10.10)
  For Mac OS X Mavericks (version 10.9)
  For PL2303 H/HX/HXD/EA/RA/SA/TA/TB chip versions
  For Prolific USB VID_067B&PID_2303 Only
 Includes Driver Installation Manual
この PL2303_MacOSX_1_6_1_20160309.zip を展開してインストールでドライバはOKとなった。
% ls -l PL2303_MacOSX_1_6_1_20160309.zip
7135649 Mar  9  2016 PL2303_MacOSX_1_6_1_20160309.zip
% shasum PL2303_MacOSX_1_6_1_20160309.zip
52c3031ab1fda0b6fe58bc09c856cb6232aed782  PL2303_MacOSX_1_6_1_20160309.zip